
THIS TUTORIAL IS SUBJECT TO COPYRIGHT LAW AND SHOULD NOT BE REPOSTED WITHOUT MY PERMISSION.
For those that can not see pics here is a link to my photo bucket.
WARNING: I know this works with my recipe, and this scent. Each formula is different, as is scent, so try this at your own risk.
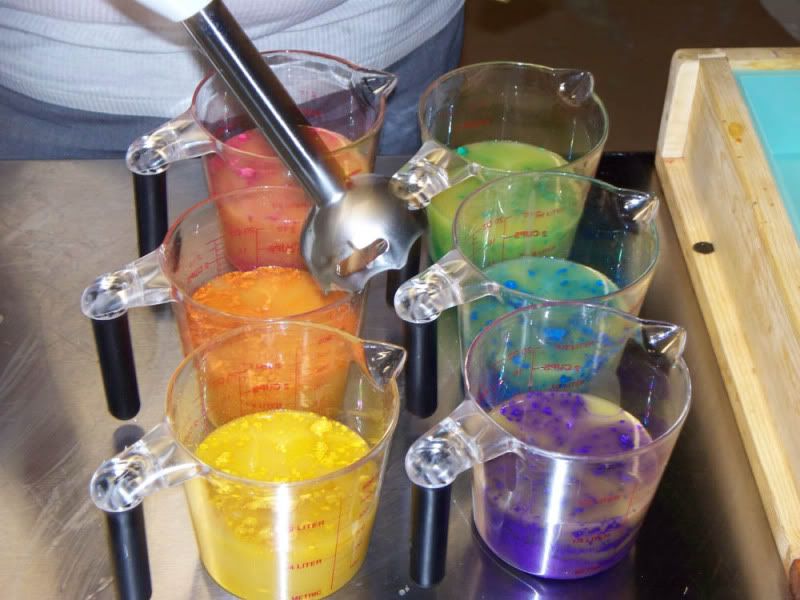
For this, set up is the most important. I have all my containers for colors set up ahead of time. I am making a 64 oz (of oils) batch. Approx 1 tsp of mica is in each cup. I have my oils melted, my lye cool, and my mold all ready. My Fragrance is already mixed into my oils.
For this soap, I have used the pop micas from TKB Trading. My base is uncolored.
 I then mix my lye into my oils. I mix until everything is just emulsified. I do move quickly, and start separating just after emulsified. Maybe the lightest trace. If you are not confident with your fragrance, or recipe, I can not guarantee you will not experience separation.
I quickly pour off my base color into each of the cups with the waiting mica. For this soap, I am pouring about 1.5 cups of raw soap into each cup.

I stick blend each color to combine. Yellow then orange. Then rinse. Then the pink. Rinse. Etc. After mixing, I am still at a light to medium trace.
 I then get ready for the In-The-Pot Swirl. For 6 colors, I will pour each color around the bucket, clockwise in rainbow order. If using similar colors, like reds, oranges, and yellows, have each color next to a contrasting one so the colors don't blend. Here I start with the pink, pouring from about -8 inches above the top of the bucket so that the color sinks all the way to the bottom. At this point, I pour about two thirds in the pot, setting the rest aside.
Here you can see the pink, orange, yellow, and green. I am pouring the blue:
 After pouring the purple (between the blue and red), I then go back and pour about half of what is left of each color in the center:
 To get the colors to actually swirl, you will need to stir the pot. Taking my spatula, I put it in the pot near the red, and go around the pot clockwise 1-2 times. I follow the same path, about 1.5 inches from the side of the pot, right where the color is. I don't head to the center. But, since I am using a larger spatula to stir, it does move the colors more then going through them, so I probably do catch soap toward the middle.The more you stir, the finer the swirls will be. Too much swirling and you risk mixing the colors too much, getting grey.
Next, you will pour into the mold. Try to pour from one end of the mold to the other, you will probably need to do more then one pass, but again, if you pour in too many passes, you risk overmixing: 
After pouring: You can leave the soap at this point, but I like to swirl on the top too. So, sow, I take the rest of the soap we saved from the swirl colors and pour on the top. By now, you are probably at a thicker trace with the left over soap, so you may have to spoon it on, or if you can, pour on the top from 3-4 inches away, so the color does not sink down and ruin the swirls below. Here I start with the pink:
And continue with other colors:
 When done with the pouring, before swirling, it will look like this:
 I like to use a thin wooden stick with pointed end to swirl the top. Here you can do lines, circles, what ever your style is:
 And when done:

Here is what it looks like cut:
After pouring:
You can leave the soap at this point, but I like to swirl on the top too. So, sow, I take the rest of the soap we saved from the swirl colors and pour on the top. By now, you are probably at a thicker trace with the left over soap, so you may have to spoon it on, or if you can, pour on the top from 3-4 inches away, so the color does not sink down and ruin the swirls below. Here I start with the pink: And continue with other colors:
When done with the pouring, before swirling, it will look like this: I like to use a thin wooden stick with pointed end to swirl the top. Here you can do lines, circles, what ever your style is: And when done: Here is what it looks like cut:

I hope this inspires a lot of soapers to push with log mold swirls using the In The Pot method. I love it!
6 comments:
Nice job! The cut bars look great. What scent did you use in this batch?
It is scented with Island Kiss from Tony's, now Southern Garden Scents.
Awesome soaps and amazing swirls!!! Thank you so much for posting this tutorial with pics....I think I can do this - yay!!!
Tanya :)
Thanks so much! The soap is gorgeous. I need to place an order with SGS and haven't tried Island Kiss yet. Looks pretty easy to work with!
Kellianne
Great tutorial! I love handmade soap so much, so it's nice to see how it's done :)
Hello KB,
I've been admiring and studying your work for a loong time...because i love how you make it all look so DO-ABLE.
However, my soap got too thick, when i tried this tonite. Soo sad.
What temps are your oils and lye when you mix them, do you use silk in this batch, and how do you KNOW when a fragrance is going to speed up the trace?
o I am so bummed. what an amateur am I.
laur.
Post a Comment